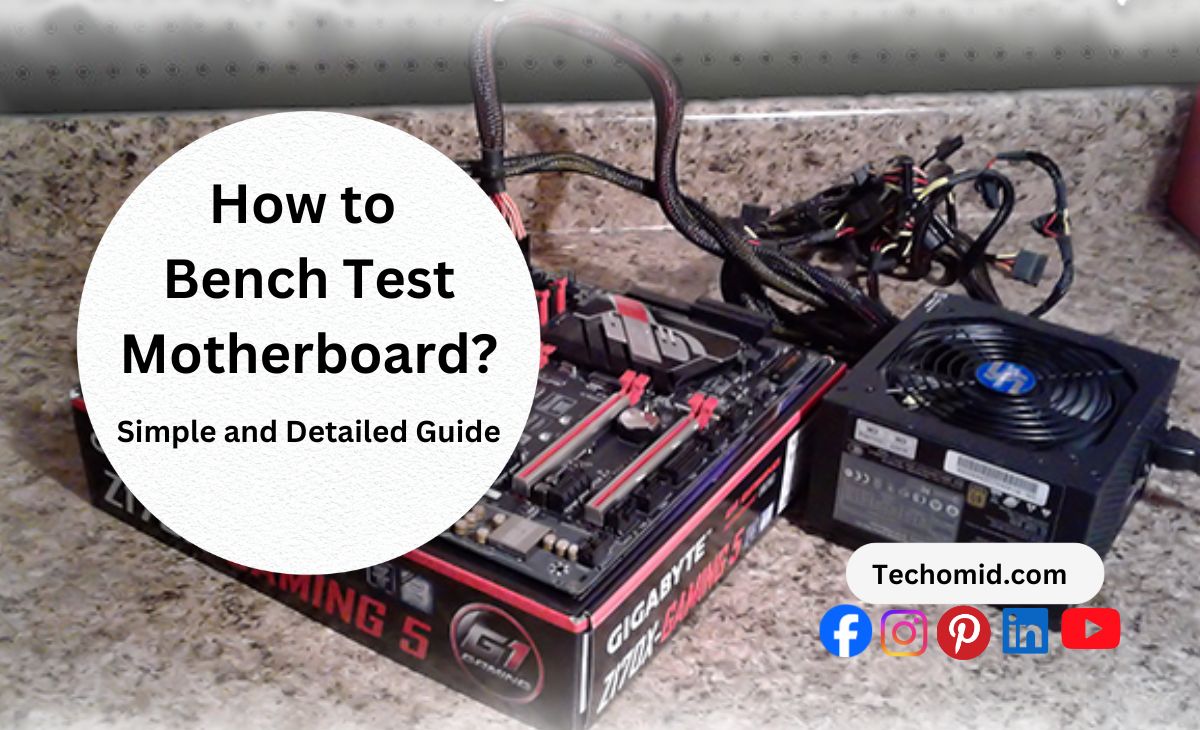
Has your computer ever refused to come on, and you just get a blank screen? When this happens, it is one of the most infuriating experiences that can happen to any PC user and you’re probably left wondering — Is my motherboard dead? However, as long as an actual motherboard is still functional, there may be no need to rush out and buy a new one right away instead try bench test motherboard for size first. It’s a relatively easy step that can save you time and money. You will not need to be a tech wizard in order to do it, I promise.
Taking the time to bench-test your motherboard is like a health check for your pc. This pinpoints precisely where the failure is occurring without disassembling the entire system. Be it a power issue, bad connections, or simply a faulty component; testing outside of the case makes isolating and correcting such issues simpler. Don’t worry, we’re going to go over the steps on how to bench-test your PC so that it can get back on track.
What Is Bench Test Motherboard and Why Should You Do It?
Which brings us to the question: what is bench testing your motherboard? It’s pretty simple. Bench testing is when you test your motherboard outside the computer case. Consider it taking your engine out and letting it run before tossing the engine back into the car. Designed as such, you do not need to be concerned about a whole load of other components in your PC, just the motherboard, CPU, RAM, and PSU.
Why should you bother? When your computer refuses to boot up, or if it’s behaving all kinds of wonky, bench testing becomes a savior. This allows you to determine whether or not the motherboard is the issue without disassembling your entire PC. You will not have to take a shot in the dark about whether the RAM or CPU is to blame or something else entirely.
Here’s why it works: when you bench test, you remove all the extra stuff that might mess with the process. No clutter. No confusion. You can see what’s working and what’s not. And the best part? You don’t have to spend hours or cash to troubleshoot. A few simple steps, and you’ll know if you’re dealing with a dead motherboard or just a little hiccup.
Plus, testing outside the case makes it easier to spot problems like loose cables, bad power supply, or even heat issues. Benchtesting your motherboard gives you control and saves you from a full system rebuild. Simple, right?
The Tools You Need to Bench Test Your Motherboard
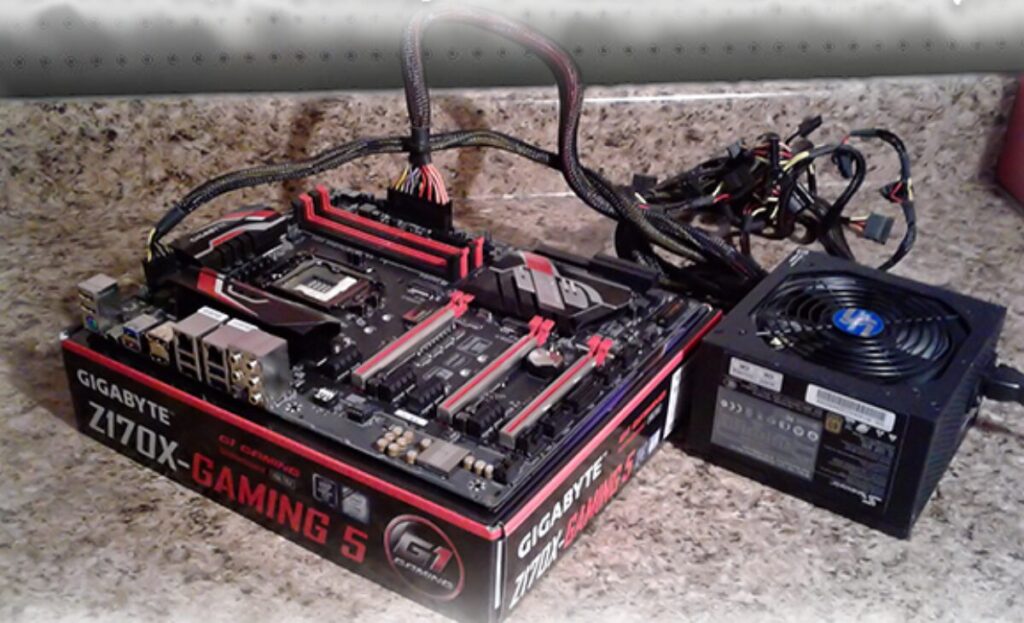
First, let’s get over with the tools that are required to bench test the motherboard. Don’t worry, nothing fancy or expensive is required. As a matter of fact, you probably have most of these tools already lying around. This is what you will need in order to get started:
Power Supply Unit (PSU): This is what buttresses the entire testing setup. The PSU supplies power to your whole system hence its of great significance. You cannot doubt the conclusiveness of the motherboard testing without it, confirm. Just make sure that their capacities are enough to support your setup. A good PSU is crucial so if you think the cheap options are worth it, then you are just asking for something which does not work.
CPU: You gotta have a CPU to bench test. It is very much the case of an automobile, no engine, no auto movement, or auto test. However, ensure that the CPU that you have is fitted in the motherboard and is functioning correctly. In most cases though, and this is truth for the variety of cases in bench testing, you don’t have to worry about overclocking or some advanced configurations at all, as you just need a plain usable CPU.
RAM: Single Stick – Mono-RAM configuration and even slightly more looks really trivial for the system under testing. This is really a biggie as RAM is one of the most frequent components to cause problems. Many people who have troubles believe the problem to have been caused by the motherboard when in fact it is poor RAM memory that is the issue. So in simple language install a single RAM stick and confirm if that was the reason of the trouble, which is straightforward.
GPU: Single Stick – Now, integrated graphics is not provided with all the motherboard, hence, if yours does not, then a graphics card will be necessary to view anything on the screen. In case your motherboard is with integrated graphics, you do not need this one.
Anti-static protector: Motherboard is the main board for any jewelry to wear on. One touch is a volcano. Nothing makes a computer as a quiet as static does. A bit of current would mean disarmament; hence, it can be avoided by taking off your electronics. No worries if you don’t have one, just touch on a metal surface before you work on the motherboard.
Monitor and keyboard: Not assuming any drama while connecting all the loose ends but in a way, I do expect some drama in case this actually works after all the stress, so it will be fun willing to use all panic buttons for rebooting the mother board while the system is relaxing watching the chaos unfold.
Screwdrivers: I would hate to have to use a screwdriver to screw the motherboard onto the anti-static mat or to place the CPU cooler into its position, not to worrysmall Phillips head screwdrivers might suffice. But let’s make sure we don’t exaggerate this luck.
Paperclip (Optional): A properly cased power switch or a button is usually what I end up touching to start systems but if I don’t have them I substitute a paperclip. The tip here is to short the red and black wires on the motherboard. Just an old wives tale if you ask me, but nonetheless effective.
So now you are ready to have a look around at the things that the resources demand from you. The situation sounds manageable since they are just some considerations I don’t envision you losing your composure away over. It does not have to be anything extravagant, you will be able to buy what you are missing for a couple bucks or use what you already have at home. So get prepared because with these tools you are prepared to inspect your motherboard.
Step-by-Step Guide: How to Bench Test Your Motherboard
Now that you have the tools, let’s go through the step-by-step procedure of bench testing your motherboard. It might sound complicated, but trust me, it is actually quite easy once you put your mind to it. You do not have to be a tech genius to be able to do this.
Let’s begin focusing on the following:
Step 1: Prepare the Surrounding Area
First, prepare a clean, static free area. An anti-static mat will protect your motherboard from static electricity damaging it. If you don’t have one, look for something metallic such as the frame of your desk to properly ground yourself.
Static electricity is the biggest enemy in dealing with electronics so always keep that in check. If you have an anti-static mat, now would be a good time to pull it out and place it on a flat surface such as a table or a desk.
Step 2: Set Up the CPU
Next we will be installing the CPU or central processing unit, which is the brain of your system. Given its importance, we need to be cautious on how it is placed into the system.
The CPU socket can be found on your motherboard. Locate it and find the lever or latch; lift the lever carefully to expose the CPU socket.
Once the CPU is exposed, carefully place it onto the socket as it needs to fit just right. It will drop into place if the angles are aligned properly. There is no need to force it.
Reattach the lever in order to secure the CPU.
Last but not least the thermal paste! If you are using an aftermarket cooler, apply a small amount of thermal paste onto the CPU’s surface. Just a little bit. There is no need to rub it in; the pressure applied by the cooler will take care of that.
Step 3: Installation of RAM
So let’s go ahead and insert the RAM, However for this particular test only one Stick of RAM is required.
Locate the RAM slot on your motherboard. It is most likely around the vicinity of the CPU.
Align the notch on the stick to the groove in the slot and push it down. If the RAM is well seated in its place, you will hear a click.
Furthermore, don’t fret about placing multiple sticks at the moment one stick will suffice for this test.
In the event that you do not hear that click sound, the RAM seems to be bottomed out in the slot, take it out, and start over until it clicks into place.
Step 4: Connecting the Power Supply
This is where things start getting interesting—this is where you start connecting the motherboard. Grab your power supply unit (PSU) and let’s hook it up.
Refer to the manual when connecting the cables. Take the 24-pin ATX power cable and secure it to the large connector on the motherboard. It’s a big rectangular connector—can’t miss it. Then, grab the 8-pin CPU power cable (sometimes just 4 pins depending on your motherboard) and plug it into the smaller connector near the CPU. Moving on, at this point the cables should have secured connections. If the connection to the power supply is not tight, it may result in the system not powering on.
At this stage, you are ready to turn on the system, or almost.
Step 5: Connect the graphics card in the relevant slot.
Those looking to build an ATX system that supports graphics without a graphic card should skip this step, otherwise retrieve a graphic card in order for this build to work. Find the PCIe slot on the motherboard – this is where your GPU (Graphics Card) goes. Using one hand, slide the graphics card into the slot, ensuring that the card remains level during installation. You should hear a click when the GPU is locked in place. If you are using a case that encloses your computer, you may have to put a screw on the back of your case, but that will not be required for now since we are working outside the case.
After the card has been inserted, plug the monitor into the GPU.
Step 6: Power The System On And Look For POST.
However, we are now in the final moment: turning the power of the motherboard on. Provided everything was plugged in properly, one should be able to see an output.
If you don’t have a case button, use a paperclip to short the power switch pins on the motherboard. This will engage the system.
The output unit should in some fashion display something on it. If nothing is visible on the screen, check the cables, power supply, and even RAM.
This is effectively the time when the ports are turned on and the motherboard self-tests whether the components of the system are functioning correctly. If there is any displaying on screen, congratulations! That would mean that the motherboard could be in a workable condition. If nothing is shown, stay unperturbed.
Troubleshooting: What to Do if Your Motherboard Doesn’t Boot?
Let’s say you have successfully installed the CPU, the RAM and the PSU, but once you turn on the system, it doesn’t respond at all. There is no need to worry. When assessing the issue with a motherboard that fails to boot, there are a few simple steps to troubleshoot.
No POST? Check if you are using the correct RAM!
There are uncountable reasons for RAM being the cause of booting problems. Any motherboard might fail to load the Booting if RAM is not placed accurately.
- Inspect the RAM modules: First, make sure the RAM is fully inserted into the ram slot. in certain occasions, it may be easy to think that the ram module is completely inserted.
- Try reinserting the RAM: if everything looks fine, gently pull it out and place it back in its slot reassuring that there is a click sound when securely placed in position.
- Switch slots: If the RAM still fails to boot after reinserting, move it to any other ram slot. It is possible that a certain slot which was being used is the issue.
Finally, if the motherboard doesn’t recognize the RAM, the entire system won’t boot. All you need is a properly seated RAM in the correct slot.
Beep Codes: What Do They Indicate?
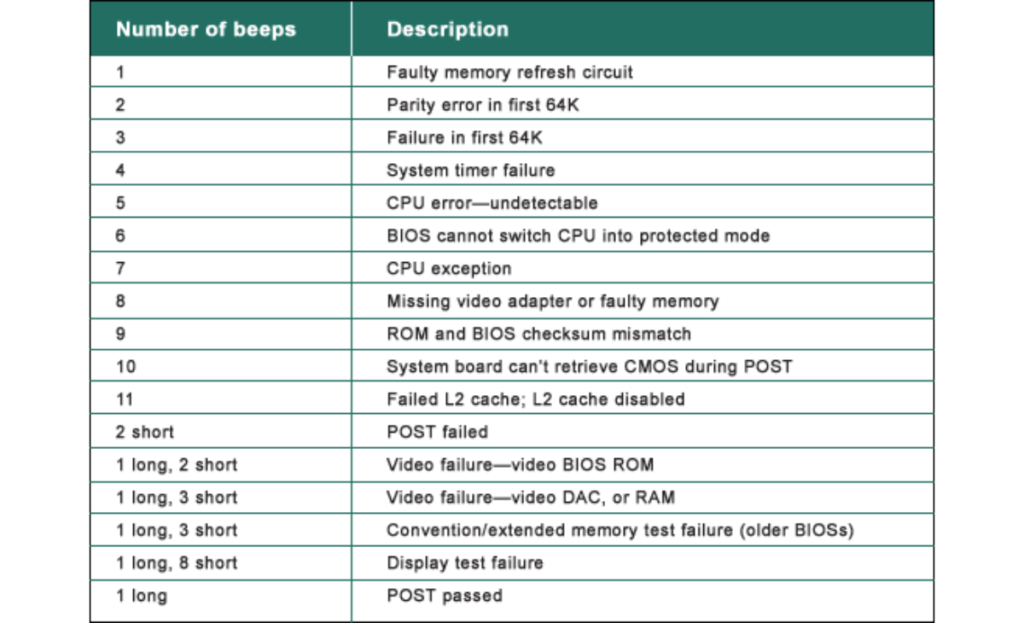
You can understand your motherboard through beeps; there is a way to say beep codes. If you can’t spot anything on the display, try to pay attention to beeps. A problem with the motherboard, according to beep codes, has been signaled.
A few of the most common codes and their meanings are played below:
- One Long Beep: Usually, ram-related issues can be presumed with a single long beep heard. A good chance is that the ram is defective or not properly seated in the motherboard sockets. Reseats or replaces the ram and check to see whether this works.
- Two Short Beeps: There is a tendency for this to indicate a video problem. If you have an external video card plug into the PCIe slot, ensure it fits properly. If your monitor graphics are integrated, ensure the monitor is connected to the appropriate port.
- Three Short Beeps: This is slightly dire. More often than not, three short beeps indicate that the motherboard is no longer responsive. It is possible that the situation is more serious, which means that the motherboard should be replaced or the entire system should undergo more tests.
Check your motherboard manual for more precise beep codes, as each has its own code set. However, beeping should be your first step towards narrowing down the cause of your problem.
Re-examine the Power Supply and Cables
Last on the checklist is the power supply and the cables connected to it. Failure to supply adequate power to the motherboard will render your computer unable to turn on.
- Go through cables that may be loosely connected: Observe the 24 pin ATX power connector and the 8 pin CPU power connector, check if they are completely inserted. These connectors tend to get touched sometimes but not connected completely.
- Has the power switch been engaged for the PSU? This might be stating the obvious, but it’s easy to overlook this step. Make sure that the switch on that unit is “on”.
- Look for any wear and tear on wires: Check for any wires that might be torn or cut. Such seemingly small problems are in fact sufficient to keep the computer from booting up.
If all the cables are on correctly and the PSU is functioning properly, you can start up the motherboard. If that’s not the case, proceed to the next step.
Taking out your CPU or trying out a different PSU (H3)
Still nothing? If so then the problem could be the CPU or the power supply unit.
- Disassembling the CPU: Simply pull out the CPU and make sure that no pins are bent and place it back into the setup. When a CPU is fitted or handled it might dislocate a little and lead to failure in booting up.
- Substitute the PSU: If there are no visible damages on the motherboard but it doesn’t power on, there are chances that the PSU is the problem. Simply replace the faulty one with a known working one. In case the new PSU works, obviously the previous psu was faulty and it needed replacement.
Not yet successful? What A Final Solution
After applying all those fixes and they still don’t work, it is time to troubleshoot other more complex problems including: Deficiencies.
- Motherboard shorts: Physically checking the motherboard to get a closer look for any possible damage could be useful in this instance, because even a loose screw or a bit of metal contact thats touching a sensitive chip, could be enough to cause a short circuit.
- Examine motherboard lights or codes: The majority of newer boards feature diagnostic LEDs or 7-segment LCD array that display specific error codes (e.g. RAM or GPU) that significantly assist with troubleshooting because a light indicates an issue, without the need for time-consuming scanning.
It is totally understandable for an individual to panic while fixing a motherboard that simply refuses to start up, but after going through the above mentioned strategies, you will not have any problems at all. Whether it’s an issue of a loose RAM stick or a problematic PSU, you can figure it all out.
Define some of the foremost things like reseating ram, checking connections, and reboots. Then go up from there. If you have all the required tools and exactly follow these steps, you’ll be set up in no time.
Crucially, your worries when bench testing a motherboard and diagnosing it should not be excessive. Focus on learning each step gradually, and you will handle the issue.
How to Interpret POST Beep Codes and Diagnostic LEDs
When your computer fails to initialize, there’s a problem with the BIOS or configuration settings. First, always check the power supply unit and motherboard connections. If your monitor is showing only a black screen, you are best utilizing the beep codes plus test LED’s available onboard. These two assist you to understand the fault without dismantling the entire system. So, let’s take a step back.
What Are POST Beep Codes?
POST stands for Power-On Self-Test. This is the first thing that the motherboard performs when the power switch is pressed. Generally, it performs a number of checks, and if all are ok, it continues to boot. If there’s even one problem, even if it is minor, the motherboard tries to beep or switches on some of its LED lights to try and tell you the issue.
There are specific computer hardware components malfunction or not positioned correctly. The instructional guide on location of hardware components are incorporated in beep codes. Long and short beeping is included; however, the two have different meanings. Think about computers with soundcards in them and morse code for everything.
The following are the most frequent beep code patterns and their definitions:
- One long beep: Typically this indicates fault in the system RAM. This specific type of motherboard may not be seeing it. Seek to reseat the RAM or relocate it to another position.
- Two short beeps: This usually indicates a POST message error, meaning that your motherboard is not able to complete its self-assessment. The issue may concern the CPU, memory or motherboard around it. Check once how everything is connected and make sure there are no obstructions that may cause a problem.
- Three short beeps: This is an advanced situation now most likely an issue with the motherboard or the CPU. If this occurs, then perhaps the motherboard is dead or there is an issue with the CPU. It’s time to investigate further or think of replacing the motherboard or CPU.
- Continuous beeping: Sometimes there is a quick beep, which sometimes gets continuous and every duration seems to be a long time. Such usually indicates that the power supply or some vital resource is off or malfunctioning.
But bear in mind that these codes are not universal and may be different for various motherboard manufacturers. Therefore, pay close attention to the manual of your motherboard in order to understand their interpretations. Just like a quick guide for dealing with concerns.
What Are Diagnostic LEDs?
Some monitors exhibit beep codes and have additional diagnostic tools such as LEDs, as well as the 7-segment display. These LEDs light up in different patterns to give you a visual clue about what’s wrong.
- CPU LED: A lit CPU Led is a good pointers CPU Controller problem might be the issue. Ensure the component is installed correctly without any form of damage.
- RAM LED: Any blinking or a ram led remained switched on might be indicative of possible damage to the ram or any of the rams sticks that are fitted into the motherboard. It is best to ensure the sticks are fitted correctly or attempt swapping them with alternate sticks for verification.
- Boot Device LED: In the event of seeing this lit on the motherboard, it presupposes a situation whereby the m-board is unable to locate any of the booting devices connected, such as the hard disk and or the SSD. In this instance, it is best to check the connections of the device and the cables.
There is also the possibility of viewing a general error LED, if present it either flashes or remains on without breaking, and points an area of operation which remains broad e.g. power or the motherboard sensors.
The first indication of an issue with your motherboard is when it fails to boot management procedures should always communicate with the PC Language in use on the system including the beep codes and the diagnostic LEDs. That communication system allows you to know what is faulty without having to guess. Next time you turn on your desktop and it is unresponsive, hear out for the beeps and also try to find those flaring LEDs. They are going to make sure that you know what the issue is hence speeding up the process of rectifying the fault.
Do yourself a favor and look into the details of your specific motherboard manual and code for troubleshooting. That way you will always have the solution at hand, for all the challenges that you face. And who knows? You might just come to love those beeps because they help to make sure your PC runs as good as new.
Best Practices to Prolong Your Motherboard’s Lifespan After Bench Testing
Once you have confirmed the enabling functions and the stability of the motherboard outside the case, your next step is to ensure that it remains in that condition as much as possible. After all, no one wants to replace a motherboard if it is avoidable, therefore it’s necessary to take care of them. One of the measures which you should take is to ensure that the motherboard is well ventilated. In the first place, your motherboard is going to lose its form most quickly due to excessive heat.
Obviously, make sure your computer is well ventilated for avoiding overheating. Sometimes, even a couple of case fans or a better CPU cooler helps a lot in keeping the temperatures down. The cooler the system is, the greater the chances of survival of the motherboard.
Lastly, Managing the dust buildup over time and performing proper and consistent cleaning is another requisite for preserving your motherboard. Dust diminishes airflow, promotes overheating, and clogs in various parts of the motherboard. Additionally, dust collection can worsen the performance of the fans. Periodic maintenance patch these issues by guaranteeing airflow efficiency.
Always remember to remove dust using compressed air while being cautious of sensitive parts as the pressure must not be too high. Regular maintenance every few months or sometimes even twice a month depending on the dust surrounding the area would help maintain the motherboard’s overall condition.
Moreover, when installing and removing motherboards or any other parts, it is essential to take good care of them because they are sensitive. Take every step required without using extra force, and while putting the hardware into place ensure that every component is in their correct position.
Remember to touch a metal object before you touch anything inside a motherboard to eliminate chances of getting static electricity because one little spark can damage the entire motherboard. Building these steps into a habit would bring long term benefits for the motherboard, therefore ensuring its durability for years.
Faqs About Bench Test Motherboard
What is the purpose of using a bench test on a motherboard?
The bench test is used to test the motherboard system along with the power supply and RAM outside of the casing. The aim is to see if the motherboard along with the CPU, RAM and other devices function properly.
Does a motherboard have to be bench tested?
Bench testing is useful in determining whether the motherboard is the cause, provided your computer does not boot. It’s a good way to do baby testing without having to disassemble all the parts of your computer.
Is it possible to bench test without having a case for the motherboard?
For bench testing, a case is not required. The motherboard can simply be placed on a clean surface free from static and then the parts that are needed can be connected.
What are the basic tools required if bench testing motherboard?
You need a power supply, CPU, RAM, and a monitor. A screwdriver and anti-static mat are helpful too.
Why is my motherboard not powering on while I try to test it?
Examine the power supply and all cables to ensure they are connected. If everything appears to be in order, remove the screws and reinsert the CPU and RAM or test using another PSU.
How can I analyze whether my motherboard has been flawed?
If after performing the troubleshooting sequence of verifying sequences of connections and checking RAM starting the system remains elusive, then the motherboard seems to be the culprit. It is possible to obtain useful information from beep codes and diagnostic LEDs.
What exactly are beep codes in post?
POST beep codes are alerts that your computer’s motherboard sends out when it comes across a problem. There are many such sequences of beeps each of which specifies the problem, such as the ‘B’ in worse case ‘BRAM’ or the fan failure.
Why does my motherboard emit the beep sound and how do I eliminate that?
Look into your motherboard and identify the pattern of beeps then refer to its manual. Each pan has a meaning attached to it e.g. a single long went sound indicates a RAM related problem while three short beeps indicate a CPU malfunction.
Is my motherboard irreversibly damaged?
It depends on the case, some cases such as broken capacitors can be fixed however in most of the other cases, it is recommended to simply get a new motherboard as it is easier and safer.
How can I avoid the situation where my motherboard fails on me altogether?
Make sure your PC is devoid of any dust, overheating and that there is proper airflow. Ensure that you take care while handling devices and that you touch the ground first to eliminate any chances of static shock or damage.
Conclusion
Lastly, conducting a bench test of your mother board can be an easy way for one to ascertain flaws within the system, for example, a malfunctioning RAM, processor, or even the mother board itself. The best part? You don’t have to dismantle your entire computer if you need one to do this.
Follow these instructions — place the motherboard on an anti-static workbench, check the necessary connections, and listen for the beeping codes. Sooner or later, you will come to understand the problem and avoid unnecessary efforts for \shooting the fault.
For most motherboard owners, avoiding faults is a huge priority. They constantly seek tips and tricks on how to maintain the condition of the board – keep it clean, cool and use it with care. Maintenance of PC should not be a hassle; with enough know-how and the right evaluation equipment, everything can run smoothly with you having to do a lot.
So, the next time your computer refuses to start, don’t start worrying. There are so many options out there from bench testing, which can potentially trouble shoot the issues for you!