When you’re deep into a gaming session or wrapping up a big project, the last thing you want is for your computer to crash. So, what is T-Sensor on motherboard? Think of it as your PC’s little watchdog. This tiny sensor keeps an eye on the temperature inside your computer, making sure everything stays cool.
You’re battling it out in your favorite game, and suddenly, the screen freezes. Your heart drops as you realize your system overheated. With a T-Sensor, you can avoid those nail-biting moments. It alerts you to rising temperatures, helping you take action before it’s too late. So, let’s dive in and explore how this unsung hero of your motherboard works and why it’s a game-changer for any PC builder or gamer!
Why Should You Care About the T-Sensor?
So, why should you care about the T-Sensor? Picture this: you’re deep into a gaming marathon. Your squad is counting on you, and every second matters. Suddenly, your screen freezes, or worse, your whole system shuts down. It’s a nightmare, right? That’s often because your computer is overheating, and that’s where the T-Sensor saves the day.
The T-Sensor is like a trusty sidekick for your PC. It constantly checks the temperature of key components, like the CPU and GPU. If things get too hot, the T-Sensor gives you a heads-up. You can adjust fan speeds or take a break to cool things down. It helps you keep your cool while you’re playing hard or working on a project.
But it’s not just for gamers. If you’re into building your own PC, having a T-Sensor is a must. It can help extend the life of your parts. When your components stay cool, they last longer. No one wants to deal with fried hardware or costly repairs. So, keeping an eye on temps can save you money in the long run. The T-Sensor isn’t just a gadget—it’s a game-changer for anyone serious about their tech!
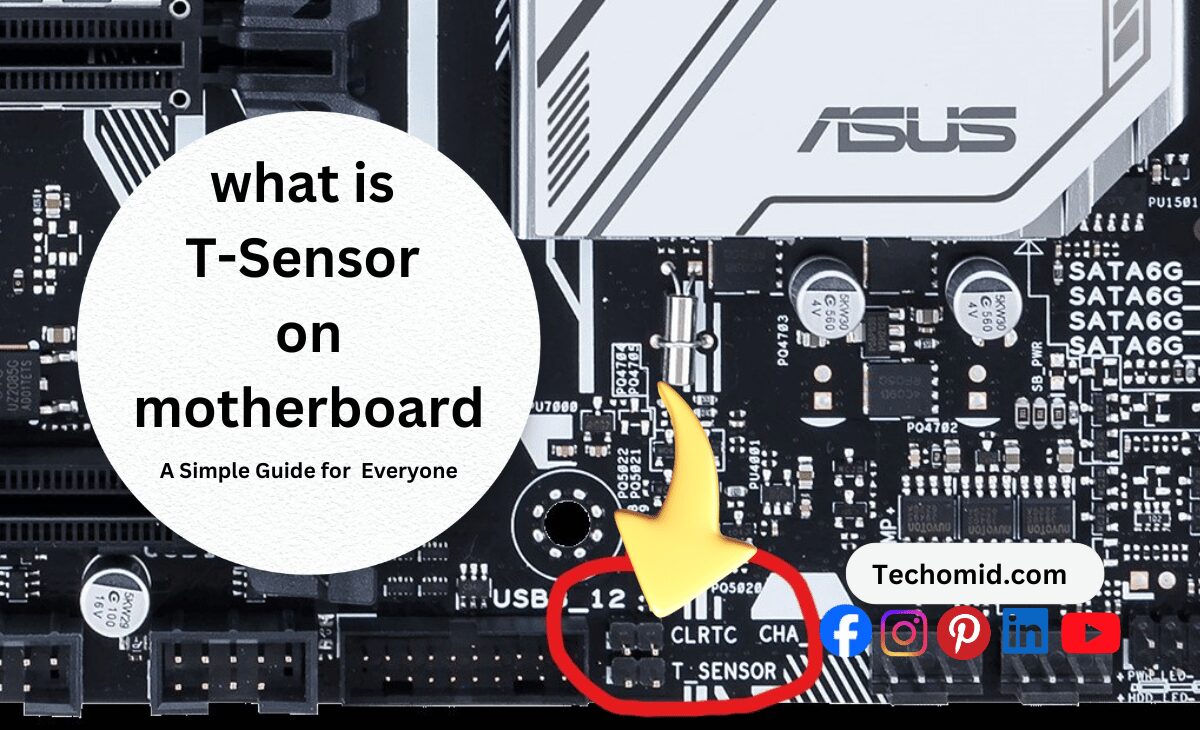
So, What is T-Sensor on Motherboard?
Think of it as a temperature monitor for your computer. This small component lives on your motherboard. It keeps an eye on the heat levels of your system, especially around important parts like the CPU and GPU. These components work hard, and when they heat up, your computer can slow down or even crash.
The T-Sensor isn’t just there to look pretty—it’s a vital tool. It usually comes with a header where you can connect temperature probes. These probes are like little thermometers that you place near key areas in your PC. When the temperature rises, the T-Sensor sends a signal. It alerts you, so you know it’s time to cool things down.
You might wonder why you need a T-Sensor if your computer has built-in temperature readings. While those are great, the T-Sensor gives you more control. It allows you to track temperatures in areas that built-in sensors might miss. That means you get a complete picture of how hot your system is getting. With a T-Sensor, you can customize your cooling strategy and keep everything running smoothly, making sure your gaming sessions or work projects go off without a hitch!
Where Can You Find the T-Sensor on Your Motherboard?
Knowing where the T-Sensor is located is super important when you’re building or upgrading your PC. It’s like finding the treasure map to keep your system cool. Let’s break it down.
Typical Location of the T-Sensor Header
Most motherboards are designed with the T-Sensor header close to fan headers or near the VRMs (Voltage Regulator Modules). These are spots that handle a lot of heat during operation. You’ll usually find it in the upper half of the motherboard, where the CPU fan headers are located. It makes sense—those parts get hot, so they need monitoring.
When you look at your motherboard, check for a small connector labeled “T_Sensor” or simply “Temp.” It might be a bit tucked away among other headers, but it’s there, ready to help. If you’re not sure where to look, your motherboard manual will be your best buddy. It has a layout diagram that shows you exactly where to find everything.
How to Identify the T-Sensor Header
Now that you know where to look, let’s talk about how to identify the T-Sensor header. It’s usually a small, three-pin connector. When you spot it, you might see it labeled, which is a big help. If it’s not labeled, don’t stress! Just keep an eye out for something that looks different from the fan connectors.
Another tip? Compare it to the other headers. The T-Sensor header often has a distinct shape and size. Once you find it, you can connect your temperature probe, which will give you real-time readings of how hot things are getting inside your PC.
Checking Your Motherboard Manual
If you’re still having trouble locating the T-Sensor, pull out that motherboard manual! It’s your go-to guide for everything tech. The manual will usually have a section that details all the connectors. This way, you won’t have to guess. Just follow the diagrams, and you’ll be set in no time.
Troubleshooting
If your motherboard doesn’t seem to have a T-Sensor header, don’t panic. Some budget or older models might skip this feature. In that case, you can look for external temperature monitoring solutions or consider upgrading your motherboard. There are plenty of options out there that come with this handy feature.
Now that you know where to find the T-Sensor and how to identify it, you’re one step closer to taking control of your PC’s temperature. This little component can make a huge difference in keeping your system running smoothly!
Why Use a T-Sensor? Key Benefits for Gamers and PC Builders
So, why even bother with a T-Sensor? You might think it’s just another gadget, but trust me—it’s more like a lifesaver for your PC. Here are a few big reasons to consider:
1. Prevent Overheating
Overheating can mess up your PC’s performance big time. Imagine you’re in the middle of an epic gaming battle, and suddenly your screen goes black. That’s often because your system got too hot and shut down. It can even lead to permanent damage if things get out of hand. A T-Sensor keeps tabs on the temperature. It warns you when things start to heat up, letting you act before it’s too late. You can adjust fan speeds, close some apps, or take a break. Keeping things cool means you can keep playing without the worry of a crash.
2. Custom Cooling Control
For gamers and DIY builders, custom cooling is huge. Why let your fans run at full speed all the time when they don’t have to? The T-Sensor gives you the power to control fan speeds based on real-time temperature readings. When things heat up, the T-Sensor kicks your fans into high gear. If it’s cooler, the fans slow down, keeping noise to a minimum. This means a quieter gaming experience and less wear and tear on your fans. Plus, it gives you the best of both worlds: great cooling when you need it and silence when you don’t.
3. Extend PC Life
Keeping your PC cool isn’t just for performance—it also helps extend the life of your components. Heat is one of the biggest threats to your hardware. Think of it like this: just like you wouldn’t leave your car running in the summer sun, you don’t want your PC to cook either. A T-Sensor can keep everything at a safe temp. This means less risk of overheating and more longevity for your hardware. So, your graphics card, CPU, and other parts can last longer, saving you money in the long run.
4. Great for Overclocking
If you’re the type who loves pushing your PC’s limits, the T-Sensor is a must-have. Overclocking can take your system to the next level, but it also raises temperatures. You don’t want to fry your components while trying to get better performance. The T-Sensor helps you manage these temps. It gives you real-time data on how hot your system is getting. With this info, you can tweak your settings and keep overclocking without burning out your system. It’s all about balancing performance and safety.
5. Peace of Mind
Lastly, having a T-Sensor gives you peace of mind. You can game, work, or browse without the constant fear of overheating. Knowing that your PC is keeping itself cool allows you to focus on what really matters—your game or project. Plus, if you ever need to troubleshoot, having that temperature data on hand can make it way easier to spot issues before they escalate.
So, whether you’re a hardcore gamer, a casual user, or someone who builds their own PCs, the T-Sensor offers real advantages. It’s more than just a tool; it’s your ally in keeping your system cool, quiet, and running smoothly for years to come.
How to Set Up a Temperature Probe with the T-Sensor
If you’re ready to take advantage of the T-Sensor, it’s time to get your external temperature probe connected. This little setup can help you keep tabs on your system’s heat levels. Let’s walk through the process step by step.
1. Check the Manual
First things first—grab your motherboard manual. This guide is your best friend. Look for the section that talks about the T-Sensor header. It’s usually labeled in the manual, which makes things a lot easier. Finding the right header is key because that’s where you’ll plug in your temperature probe. If you don’t have a manual, don’t sweat it! You can often find a PDF version on the manufacturer’s website.
2. Choose the Right Probe
Next up, you’ll need to choose the right temperature probe. Most T-Sensor headers work with a thermistor probe. What’s a thermistor? It’s a fancy term for a temperature sensor that changes its resistance based on heat. As the temperature rises or falls, the resistance changes, allowing your motherboard to track the temperature accurately. Make sure to get a probe that’s compatible with your motherboard to avoid any headaches later on.
3. Attach the Probe
Now it’s time to get hands-on. Locate the T-Sensor header on your motherboard. It should be a small connector with a few pins. Carefully connect the probe to the T-Sensor header. You should feel it click into place. Make sure it’s snug—loose connections can lead to inaccurate readings or no readings at all. Take your time to ensure it’s securely attached.
4. Place the Probe
Once the probe is attached, it’s all about placement. Where you put the probe matters. Think about areas you want to keep an eye on, like near the RAM, VRMs (Voltage Regulator Modules), or GPU. These spots tend to generate the most heat, so monitoring them is a smart move. Use a bit of tape or a zip tie to secure the probe in place, so it doesn’t move around. Just make sure it’s not touching any moving parts or blocking airflow.
5. Set Up Fan Controls
Now that your probe is in place, it’s time to set up fan controls. This is where the magic happens! You can manage your fan speeds based on the readings from your T-Sensor. To do this, go into your BIOS. When you boot up your computer, press the key (often DEL or F2) to enter the BIOS menu. Look for the fan control section.
If you’re not a BIOS whiz, no worries! You can also use software like HWMonitor or Fan Xpert. These programs let you monitor temperatures and adjust fan speeds right from your desktop. You can create profiles that tell your fans to speed up when things get hot, and slow down when temperatures drop. This way, you keep everything cool without unnecessary noise.
Monitoring T-Sensor Data with BIOS and Software Tools
Once your T-Sensor is set up, you’ll want to keep a close eye on your system’s temperature. Luckily, you can do this easily through the BIOS or with some handy software tools. Let’s break it down so you know exactly how to monitor those temps.
Using the BIOS
Most motherboards let you check T-Sensor data right in the BIOS. This is like the control center for your computer. To get there, reboot your PC and press the key that takes you to the BIOS menu—usually, it’s the DEL or F2 key.
Once you’re in the BIOS, look for the “Temperature” section. It’s often under a tab called “Hardware Monitor” or “PC Health Status.” Here, you can see the temperature readings from your T-Sensor. This is where it gets cool—you can even adjust fan curves based on those readings.
What’s a fan curve? It’s basically how your fans respond to temperature changes. For example, you can set your fans to spin faster when the temp hits a certain level. This helps keep your PC cool during those intense gaming sessions or heavy workloads. So, don’t skip this step; checking the BIOS is a straightforward way to stay on top of your system’s health.
Recommended Software for Real-Time Monitoring
If you want even more control and real-time monitoring, there are some great software options you can use right from your desktop. Here are a few popular ones:
- HWMonitor: This is a free tool that shows real-time readings from your T-Sensor, CPU, GPU, and more. It’s simple to use and gives you a clear view of how hot things are getting. You can see all your temperatures in one place, which is super handy.
- Fan Xpert (for ASUS boards): If you have an ASUS motherboard, Fan Xpert is a must-have. This software allows you to customize your fan profiles based on T-Sensor readings. You can set it up so that your fans kick into high gear when temps rise. This keeps your system cool without annoying noise when it’s running smoothly.
- MSI Dragon Center: For those using MSI motherboards, Dragon Center is another awesome tool. It helps you manage temperatures and adjust cooling settings easily. You can monitor all your system’s temps and make adjustments right from your desktop, which is way more convenient than diving into the BIOS every time.
These tools make it easy to keep an eye on your temperatures and adjust fan speeds as needed. With the right software, you can monitor everything without any hassle. Plus, you can relax knowing your system is running cool and quiet, allowing you to focus on gaming or working without interruptions.
T-Sensor Applications for Gaming and Overclocking
When it comes to gaming and overclocking, having a T-Sensor in your setup can make a world of difference. Let’s dive into how this little device can help keep your gaming sessions smooth and your overclocking efforts safe.
Keeping Gaming PCs Cool
Nothing ruins an epic gaming session faster than lag or a system crash caused by overheating. Picture this: you’re in a heated battle, and suddenly, your frame rates drop. It’s frustrating, right? That’s usually because your PC is getting too hot.
With the T-Sensor, you can keep an eye on temperatures in real-time. If things start heating up during intense gameplay, the T-Sensor alerts you. You can then take action to cool things down. This might mean cranking up your fans or even taking a quick break to let your system chill out.
By keeping your PC cool, you ensure that your performance stays sharp. No more sudden slowdowns or crashes! The T-Sensor helps you maintain steady frame rates, so you can focus on your game and not on whether your PC will hold up. It’s all about enjoying the game without interruptions.
Safe Overclocking
If you love pushing your system to its limits, then overclocking is probably on your radar. Overclocking boosts your CPU and GPU performance beyond their factory settings. This can lead to better frame rates and faster processing. But here’s the catch: overclocking generates extra heat.
That’s where the T-Sensor becomes a lifesaver. It gives you real-time feedback on how hot your system is getting. With this data, you can keep your temperatures in check. If the T-Sensor shows that things are getting too warm, you can adjust your settings right away.
You might choose to lower your overclock, increase fan speeds, or even pause to let your system cool down. This proactive approach helps you avoid potential damage from overheating. You get to enjoy the performance boost without the risk of frying your hardware.
With the T-Sensor, you can confidently overclock your system, knowing you have a way to monitor heat levels. This balance of performance and safety is key for any serious gamer or PC enthusiast.
FAQs
Do I Need a T-Sensor on My Motherboard?
Not everyone needs a T-Sensor, but if you’re serious about gaming, building custom PCs, or overclocking, it’s a great tool to have.
Where’s the Best Place to Put the T-Sensor Probe?
Great question! Common spots include near the VRMs, CPU, GPU, or storage drives—basically, anywhere that gets warm.
How Does the T-Sensor Differ from Other Temperature Sensors?
Most PCs have built-in sensors for the CPU and GPU, but the T-Sensor lets you monitor other parts of your system where heat might build up.
Can the T-Sensor Work with Liquid Cooling?
Yes! Many liquid cooling setups benefit from T-Sensors by monitoring areas that aren’t directly cooled by the liquid loop.
Conclusion
A T-Sensor might not be the flashiest part of your computer, but it packs a serious punch when it comes to keeping your system running smoothly. Think about it—when you’re gaming, overclocking, or just trying to get things done, the last thing you want is for your PC to overheat. That’s where the T-Sensor comes in.
It helps you monitor temperatures and control cooling in real-time. This means fewer unexpected shutdowns and more time enjoying your games or projects. By keeping your system cool, you also help extend the life of your hardware. No one wants to deal with costly repairs or replacements because of overheating!
If you’re building your own PC or just want to learn more about cooling options, make sure to check out the T-Sensor on your motherboard. It’s a small tool, but it can make a huge difference. So, take charge of your cooling game and let the T-Sensor help you keep things chill. You’ll be glad you did!